

Here’s the fireplace with added wings on the edges, sanded and primed. If I can clear the decks this weekend I’m hoping to finish this project off and move back in before next Monday. Cross your fingers.

This took a little longer than I thought because I built the boxes with 45° angles to avoid having the edge of the woodgrain to deal with when I finish. Clamps are a wonderful invention, and I need to buy more of them.

This is the other side. Under this section we’ll put the rounded bead, and above it will go a milled edge finished off with a 1/2″ flat cap.
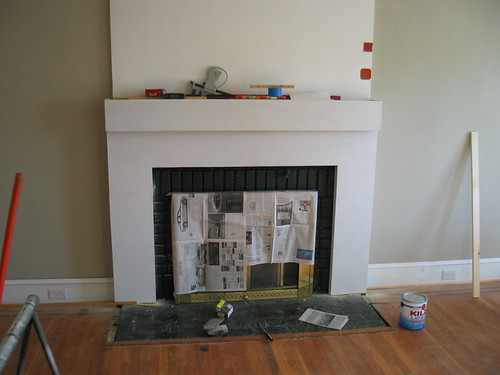
Cleaned up and primed; the newspaper stays until the final coat of black is on.
I spent the three-day weekend nesting, which felt good after two weeks of upheaval and chaos. Nesting for me generally means power tools and some kind of mess will be involved, and this weekend was no different.

(Here’s more information and pictures.) Sorry about the yellow cast to the picture; I forgot to change the white balance setting.
When last we left, the fireplace was covered in a wood and cardboard facia, waiting for a permanent cover to be installed. I pulled the cardboard off weeks ago, and now that the ceiling and baseboards are done, the fireplace is the last thing to be worked on.

This weekend we went searching for suitable lumber to work with, and found that there isn’t much to choose from in the major home supply stores. I was looking for a good sheet of 1/2″ sanded plywood, but all we could find was 3/4″ plywood or 3/4″ MDF and nothing close to useable in 1/2″ thickness. I decided on sanded birch redwood plywood for the face and pine for the sides. Unfortunately, the first try at the sides did not allow for a bevel cut, so I had to go back out for thicker planks and start from scratch. It was at this time, hidden in the back of the store, that I found sheets of 1/2″ MDF for half the price of the plywood. Oh, well.

I could only find quality planks in poplar that worked, so I sucked up the extra cost and bought them. The first step was to get the sides correct. First I cut and beveled the insides and then the tops, adjusted the height, planed the bottoms to fit the walls, and tacked them in. This was mostly easy, as it was all tablesaw work, but the hard part was next: milling a $35 board down correctly, with squared beveled cuts in four places. Here I had to get creative with a circular saw, and wisely decided my current saw was not up to the task.
My saw is a Makita that was rescued from a reposessed vehicle eighteen years ago and has been with me ever since. It’s a great saw but it was used hard before I got it, and I’ve used it hard ever since. The rental I got is a new 8″ version of my saw, which means the fittings and calibration are correct, and I can trust that 45° means 45°. The only beef I have with it is that it doesn’t have a guide fence (or a fitting for one) so that I have to manually set up guide fences with wood and clamps to get a clean cut. Otherwise, the motor is strong, and the build quality is great.

The first three cuts went very well, but the angle of the fourth cut was opposite the saw’s cutting angle. First, I backed away from the finish edge by a quarter-inch and made the cut straight to remove the center. Then I tried to drop the circular saw in to make the cut, but soon realized this was a mistake, and almost ruined two hours’ worth of work. Instead I made a fence for my router, routed out about 1/2 the depth of the board with a miter bit, and then used a 45° bit to follow it down to the elbow, where I used a handsaw to finish the edge.

A few more adjustments to the feet, and I had the faceplate tacked in. Next, I beveled each side and the bottom of a new plank for the mantle facia, adjusted the width, and tacked that into place. Finally, I cut and fit the inserts for the inside edges of the fascia and tacked them in too.
Now, the finish work. The plan is to pull the front plates off, secure the sides into the framework, and install some shims on each side. Then the front plates go back on for good. Next I put in some faux feet to follow the line of the kickplate on either side and cover the uneven floor on each side.
The real challenge will be to find decent cap molding for the top edge of the mantle to mimic that of the rest of the woodwork in the house. I have no idea where to find this, only that it will be hard and that the major chain stores don’t carry anything worth using.
Today we woke up late in our own bed with noplace to be and nothing to prepare. After coffee and breakfast down the street, we hit the grocery store to stock up on essentials and the Home Depot for one more piece of wood. On the way home I spied a Scout in the Sunny’s parking lot so I wrote a quick letter and returned to the store to see if the owner was present, found a nice guy who, unfortunately, didn’t want to buy my truck, and came back home to get started on the day.
Jen and I cleaned out the office and the atrium, threw away most of the stuff left over from Penn’s habitation (FIP is contagious, after all) and scrubbed the floors and walls. Then, for the first time in over a year, we opened the office door and let the other cats explore. I’ve been waiting to do that all week, and it felt good.
Downstairs, I’m almost finished with the baseboards. With the exception of one corner, all the cap molding is in place, the toe molding is stained and in place, the walls are cut in, and the electrical is installed. The hallway got cut in, I put the lights back up, and the floor is mopped. Now I start on the fireplace cover so that we can finally button up the wall molding and call the room done.

That’s 1/2″ of drywall up there, with one coat of mud on the seams. As of this writing, there’s a second coat drying.

Meh. About 40 or so kids this year, but not a steady stream. One group of about 30 fought to get up our stairs, get candy, and get back down all at the same time. The house looked friendly, though.
So, the electricians are back downstairs, running wires, cutting holes, and troubleshooting the nightmare of our electric service. The kitchen lights are in (w00t!), a major triumph, and the living room baseboard is going in as we speak. However, the $10 deep-discount hanging lights we bought for the dining room turned out to be 40-watt duds which only take mini bulbs. So they’re going to put in a single worklight over the table on a new dimmer and I’ll replace it with a chandelier when we actually find something we like.
Pictures of my kitchen cieling to follow.
Last Thursday, we had two electricians here sawing into the living room ceiling to install recessed lights. I’ll point you over to the often-ignored houseblog for the gory details, but that’s not the focus of this little story. No, the funny thing is just how messed up the wiring is in this house of ours.
The good Doctor, over the years, made additions and modifications to this house to suit the needs of a family of nine. However, none of these were made with any common sense, and they were carried out by bumbling incompetents. Originally built in 1925, the house came with knob and wire going to each bedroom for a total of one light (in the middle of the ceiling), one switch (for aformentioned light) and one baseboard outlet (varying in quality from a single ungrounded socket to a crumbling ungrounded dual socket.) Additions to this system included raised track wiring in one bedroom for a total of three sockets, Bell Telephone hookups into the front bedroom which resulted in the careless removal of one floor plank and replacement with a board of lesser height and value, and a bewildering maze of additions to random circuits for new lights and sockets throughout the house.
Much like the addition of heat to the doctor’s office on the front porch (which simply involved relocating the radiators that used to be in the living room and dining room, leaving the bottom front of the house cold and drafty), addition of wiring to the office was done randomly and without regard to already overtaxed circuits. At one point, the Doctor had the entire doctor’s exam room, his office, and the baseboard for the first floor on one 15-amp breaker. It’s a miracle this house hasn’t gone up in a brilliant ball of flame by now. (Don’t even get me started on the live gas line going up into the exam bathroom, theoretically for a bunsen burner or some other gas-fired scientific equipment—that fucker never passed a code inspection.)
As a result, our electrical panel in the basement, which is a brand-new 220 service, is nearly full. Throwing a breaker is a little like playing Russian Roulette, because there’s no rhyme or reason to the wiring layout. Turning off the breaker clearly marked “living room” disables one socket in the northwest corner. The other three are still live—the east side sockets are on the breaker marked “office lights” and the other western socket is a holdover from the days when the entire first floor shared a breaker. Currently, I can shut off power to a basement outlet and kill the attic lights in the bargain. Power to the atrium outlet is shared by the lamp at the end of our front walkway.
In the last three years, we’ve made progress remedying this situation. Each bedroom is now on its own circuit, as is the kitchen, the hallway, and the dining room. As we’ve bypassed them, we’ve killed the old circuits, but this often has unintended consequences: an outlet in some random location will cease to function.
The electricians finished the living room lights last week and had to schedule next Tuesday to finish the other jobs. In the meantime, the power on three of the four baseboards is off, which means that the entire east side of the doctor’s office is dark—lights, sockets, everything. The lights in the iceroom and coal cellar are dead too. And so is my music server, which sits on a cabinet in the exam room. I miss my music.
(Humorous sidenote: The electricians put a hole in the living room wall for the dimmer switches and found a “patch” over the original outlet box hole, consisting of wadded pages of a 1952 Baltimore Sun covered with a quart of plaster. The wiring in the walls, leading to a hastily capped junction box in the ceiling, were still live. This, apparently, was how electrical repairs were done during the Eiesenhower Administration.)
Every year at about this time, when the leaves begin to fall and the storm windows start coming down, Jen and I get the irresistable urge to start changing stuff around. This is in part due to the proximity of Thanksgiving, when the Dugan clan makes its pilgrimage south for the Eating Of The Bird, and our own natural nesting instincts kicking into gear.
In general, this year has been different than the last, because we’ve ignored our house for eight months while our businesses have been getting traction. Sure, I was able to get the living room windows scraped, cleaned, and painted, and Jen made good headway on the garden, but that was in the spring, centuries ago, when it was warm.
Last week, after a few checks came in, we decided to call in some pros and finally get our living room wired. Up until now, it’s been incomplete, with a coat of paint on the walls, no baseboards, and a cardboard facade over the nasty fireplace brick.


Our electrician recommended recessed lighting for the ceiling as a way to warm up the space evenly and add some variation to the lighting zones. The living room at one time had a central chandelier which was taken down and capped over, so there was no light switch in the whole room.
During:


The blue tape in this shot is the outline of what will soon be the pass-through French door into the doctor’s office. To the left of the door on the other side is a half-bath.


The hole in the center is the location of the old chandelier box, which is now gone. The little holes behind that are from the wire hopping the joists. They will be covered by drywall at the end of the job.

The housings are HALO brand 6″ fittings; I think in hindsight I’d choose the 4″, and that’s what I’m going to specify for the kitchen. Overall, the light they throw is warm and full. We put the two over the fireplace on their own dimmer, and the other eight are ganged on a 600w dimmer of their own.
This is step one; The next phase is to wire the baseboards and get the room on its own circuit. We’ll be putting two plugs in on each baseboard as well as cable, phone and ethernet jacks. Phase three is to have professional drywallers come in and put 1/2″ sheetrock up on the ceiling over the plaster and around the lights so that the ripples and patches in the ceiling are covered for a smooth appearance.