

My lovely wife found this light fixture online at Lumens, and she knew it would be perfect for our dining room. It’s a new edition of a George Nelson classic, and I think it fits the room (and the vibe of the house) perfectly.

Meanwhile, we’ve got a different light up for sale on Craigslist. Honk if you’re interested!
A few months ago, Jen and I bought a Pur water filter from Sam’s Club, the kind that screws onto the end of the faucet and hangs over the sink. For $40, I figured it was better than buying another stupid Pur filter for the pitcher in our fridge. Installation was pretty easy, and when I turned the water on, it flowed through the tap smoothly. When I turned the filter on, however, water began shooting from each seam in the plastic housing, bypassing the filter and spraying the entire sink. No amount of tinkering fixed the problem, and I gave up on it in disgust.
The second contestant is pictured here:

It’s a Whirlpool WHCF-SUF under sink main faucet filtration system. Theoretically, it’s supposed to sit in between the cold water supply valve and your kitchen faucet, and filter out all sorts of harmful impurities from your cold water. In reality, it’s a waste of money and time.

See the little blue hoses there? Some genius engineer at Whirlpool decided to substitute them in place of normal $.50 threaded hoses, the kind that are easily obtainable at any hardware store. This is a halfassed plastic hose and pressure clamp attachment that does not stand up to normal water pressure. This means that after one has spent fifteen backbreaking minutes under the kitchen sink, disconnecting the old hoses, screwing the filter head into the cabinet wall, and attaching the plastic hoses, water will spray all over the underside of the cabinet when the pressure is turned back on. No attempt to correct the situation will result in success, and only result in soaked frustration.
I’m no plumber, but I’ve run a couple hundred feet of PVC tubing and sweated my share of copper joints. I should have realized this was a bullshit product when I opened the box, but I chose to give it a try. Don’t make the same mistake I did.
We’re going to have a real plumber come in and give us a quote on installing a whole-house filtration system, something that goes in with copper tubing, pressure relief valves, and a warranty. Enough of the mickey mouse bullshit.
Well, several weeks of farting around have resulted in the first of a series of howidunit articles about the fireplace mantel, which you can see here. Comments are open and welcomed.

Disclaimer: I don’t claim to be a professional carpenter. I don’t even claim to be an amateur carpenter, because that would mean I might have read a book about carpentry at some point. This narrative is in no way the recommended method of completing this project; I’m just documenting my experience so that others can learn from my mistakes. All the materials here were purchased at my neighborhood Home Improvement Warehouse(s) and tool rental centers, which kept my costs way down.
In a recent copy of This Old House, I found a gatefold article titled “Installing A Mantel”, with diagrams, instructions, and a few prefab examples with links to manufacturers. What amazed me was not the simplistic, breezy instruction list, but the cost of the prefabbed examples-all of them were over $1,000, and none of the featured models matched the simple woodwork in my house.
A year before I found the article, I’d decided to build my own mantel to match the woodwork in our house, a 1925 foursquare. When we bought the house, my wife and I inherited a brick fireplace with a simple slab of oak as a mantel. The brick, from what I can gather, was originally a dark color, and the mortar was set back from the edges by 1/4″, an aesthetic I wouldn’t have appreciated in any decade. To top it off, it had been covered in successive coats of white paint and left to absorb years of cigarette smoke, so that it became a shade of what she dubbed “Phillip Morris White.” The brick hearth was painted black, and a square brass surround was installed (poorly), which kept the heat in the house when the fireplace was not in use.

The first thing I did was to build a simple skeleton around the existing brick, anchoring two support studs into the wall on their sides to reach out past the brickwork. To this framing, I added studs going across the front of the brickwork and down to the hearth, forming feet, and then built out a box for the mantel at the top.

To this skeleton, I stapled some cardboard and whitewashed it as well as possible so that we could get a feel for how large the finished box would be. And there it sat for about eight months, while we worked on the room around it-installing new electric wiring, recessed lighting, and putting in drywall to shore up the old plaster and lathe ceiling, etc.)
When the baseboards were finally ready to go back in permanently, I started to work out how the mantel would look in my head, and how I wanted the diferent elements to look in relation to one another.
Our woodworking is done in a simple style; the doors and windows are framed in 5″ boards with round beveled edges, topped with a 1/2″ beveled cap. Above the cap is another 5″ square-finished board, and on the top edge of this board is a cap molding in a size no longer mass-manufactured. The bottoms are finished off with a beveled “foot” which is a true 1″ thick board, at a height of 4″. (Finding wood to recreate this foot has been lots of fun, but I’ve found that better Lowe’s locations carry 1″ thick pine these days.)
For the face of the mantel, I started by selecting the best sheet of wood I could find in a 4×8′ size, which turned out to be 3/4″ sanded birch plywood. Later, on a return trip to the same store, I found a sheet of 5/8″ MDF for half the cost, hidden around the corner-oh, well. I’ve never worked with MDF before, but I imagine it’s a lot more forgiving than plywood. The moral of the story: Keep your eyes open.
For each of the sidewalls I used poplar, which comes in many of the same sizes as pine, but is usually a better grade and free of knots. It’s a harder wood, which can be more difficult to cut, but the flip side is that it’s usually dry and straight at the store (something the standard-grade pine is usually not.) Wood with knots is harder to smooth and paint, and often sap will drool out of the holes.
I first shimmed out the original frame I’d built to be as square and level as possible. The mantel is actually 3/4″ further from the wall on the left side than the right, so I knew milling the sidewalls was going to be difficult. Once everything was level, I measured off the front of the brickwork (figuring it had been put up level and square, and the house had settled around it) to make sure the front of my mantel wouldn’t stick farther out on one side than the other.
My first step was to cut the sidewalls so that I had square, leveled edges to work from. My original plan was to cut them shaped like an upside-down L so that the leg would form a box for the mantel itself. I measured off the brick once again so that the forward edges were both equally distant from the brick face, and cut two pieces on my table saw down to the right depth. Then I cranked the blade to a 45° angle and cut the bevels on the forward edges. Upstairs, after checking each side for fit, I used a hand planer to shape the backside of the planks to fit the, um, peculiar shape of the wall. After about eight hundred test fits, I got each side to fit the wall correctly and then tacked them into place with some 2″ nails. (Let me just take a moment to preach The Gospel of predrilling any nail holes used to construct anything serious. It’s almost important enough to warrant buying a second drill specifically for predrilling, so that a primary drill can be freed up for other tasks.)
After shimming and fitting the sides so that they were level and equidistant (measure from side to side and then in an X shape from each corner), I moved on to the face of the mantel. First, I set up a straight jig for a circular saw along a short edge of the board and cut down the length with the blade at 45°. Measuring the width of the front face one last time, I set the jig up on the other side and cut it down, making sure I made a straight line with the saw.
Next, measuring the opening, I marked up the back of the plywood for the cutout on the inside. I’ve read in various places about minimum firebox clearances (essentially, keeping anything flammable away from what is called “heat and glow”) and several places mentioned 16″ as a firm number. The This Old House article says “The National Fire Code says that all combustible material must be 1 inch away from the firebox opening for every 1/8 inch it protrudes from the surface, with a minimum 6-inch clearance all around.” I had to contend with the damper handle above the opening, so I used that as my point of reference and measured the sides to fit aesthetically with it. My sidewalls are a little inside 6″, but I found that anything thinner on the sides began to look spindly and weak. (Please don’t rat me out.) The inside walls of the mantel were also going to be beveled so that I could fit it snug to the edge of the brick, but I knew this would get tricky quickly. For the left side of the mantel, the job was easy. I made another jig and ran the saw up to my line.
I clamped a fence for a jigsaw along the top edge, adding 1/2″ to the final measurement so that I’d have some excess on my finished board. Then, I drilled a pilot hole on one side and cut the top edge out. My scrollsaw has a very thin, pliable blade, so it can’t be counted on for a straight 90° cut. I’ll come back to this in a little while.
But here’s where the fun starts. The circular saw will do a 45° angle going one way, but won’t adjust to go the other way, even if the board is flipped on its back. I had to be creative here. Looking through the tools at the store, I found a bit for my router which cut a 45° angle at a depth slightly more than 1/2″, which wasn’t deep enough to go through the entire board.
However, when I thought about it a little while longer, I found a straight bit which cut a square groove at a width of 1/2″, which was exactly what I needed.
What I finally worked out on a scrap plank was this: First, I made a straight 90° cut along the edge so that I could take the entire interior piece out. Then, I flipped the board and routed two parallel grooves along the interior of the cut so that the depth of the remaining board was less than the depth of the 45° router bit. Next, I measured the distance between the edge of the angled router bit and the edge of the router deck, and made a fence for the router to guide it in a straight line. Finally, I cut the edge of the board with the router slowly and carefully, stopping the router about 1/2″ before the 90° angle at the top of the mantel.
Finally, I clamped a fence on the top horizontal cut to clean it up—this is where I used the jigsaw with the flexible blade, remember—and cut as much as I could going one way with the circular saw, then measured, realigned the fence, and cut it to the edge going the other way. Cleaning the edges up with a handsaw, I had both the beveled cuts completed and the face ready to go.
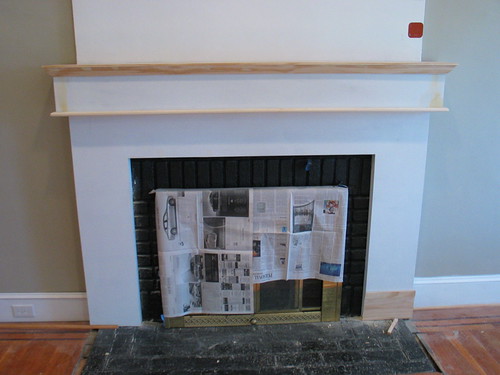
With the mantel and its sidewalls cut, it was time for the first test-fitting. I pulled out the level and tape measure, and tacked the sidewalls into place on the framework. Then, I fitted the mantel face up to the sidewalls and made sure everything aligned and leveled correctly. With some minor trimming to the bottom of the face, the board fit up almost exactly to the sidewalls.

Yeah, I know—I’m as surprised as you are. But it actually worked.
Next: Building the box on the top, take one.
2 lbs. of live mussels are $3 at our local Korean grocery, and that’s just too cheap not to take advantage of. Most of the recipes we’ve found have been very bland and tasteless, so I went looking for something with some flavor to make for our holiday party. After some experimentation and testing, here’s a home-brewed recipe for steamed mussels which has great flavor and tasty broth:
- 1/4 cup olive oil
- 1/4 cup butter
- 2 cups of white wine
- 1/4 teaspoon dried red pepper flakes
- 6 cloves of garlic, minced
- 1/4 cup chopped basil
- 3 tablespoons of fresh chopped parsley
- 6-8 chopped vine tomatoes
- 1 onion, chopped
- 4 shallots, chopped
- 1 red pepper, chopped
- 4 lbs. mussels, scrubbed and cleaned (use a vegetable scrubber; clean off any of the “beard”-the stringy stuff that may be still attached to the shell. Cut or pull that off.) Dump any with broken shells or that don’t close when they’re run under water or tapped with a fingernail.
In a big lobster pot, heat the butter and olive oil over medium heat. Add the onion, garlic, peppers and shallots and stir until the onion is cooked, about 4-5 minutes.
Add the tomatoes, parsley, basil and pepper flakes. Reduce the heat and simmer for about 25 minutes, stirring occasionally.
Add the wine and put a steamer into the pot, and add the mussels, discarding any that don’t clamp shut when tapped. Cover and bring to a boil. Cook them for 3-5 minutes, making sure you toss the mussels so that they all get steamed, and remove once they’ve all opened (throw out the ones that aren’t open.)
Here’s the tricky part: Move the mussels into a holding bowl, and scoop out as much of the tomato mixture as you can into a serving bowl, until there’s just broth left in the bottom of the pot. Put the mussels in the serving bowl over the tomato mixture, then pour the broth over the mussels so they get a nice warm bath. Serve immediately, with some good Italian bread for dipping. (Alternatively, I just put the mussels into one bowl and dumped the tomato broth over them, and had to toss them to get the tomato to mix evenly—it’s really your call.) Have a few empty bowls on hand for discarded shells.
Make sure your guests who are unfamiliar with shellfish know not to eat any mussels that haven’t opened or that aren’t cooked completely! You’ll probably miss one or two of these.
I’d guess you could add a little more butter and white wine for a looser broth—better for dipping with bread. Serve with some good red wine and plenty of napkins. This recipe was enough for 6-8 people, in our experience.
Enjoy!

We moved furniture back into the living room on Saturday night after everything got final coats of paint. The area above the mantel is supposed to be darker than the wall, but it’s not dark enough for us yet. It’s great to have everything coming back to normal again, and even better to look at the base of the walls and see crisp white paint on clean new baseboard going around the length of the room. For your amusement (and my indulgence), here are some before and after shots. I don’t have any good shots of the room in original condition, unfortunately.

6.4.05 This is the day I tore the nasty wood paneling off the wall. (note the shitty floor, pre-sanded.)

6.4.05 After the paneling came down, before I patched the wall (note the chimney.)

This afternoon.
This fireplace thing has been burning up all my free time, to the point where I’ve been up until 1AM this entire week trying to get it finished. The problem with carpentry, I’m finding, is that the amount of time needed to finish the project multiplies exponentially as the project gets closer to completion. (This logic, of course, states that the project will never get done, but don’t tell that to my wife.)

Anyway, I was able to get paint on the entire thing last night after the final sanding was completed, and this is what it looks like. There are some small issues to be touched up, but overall I’m happy with the results.

It got even better after two coats of super bright white semi-gloss; having the walls and trimwork on either side cleaned up sets it off even better. Today I’m going to put two more coats of paint on it, clean up the sides, and touch up the black on the brick.
I posted an entry to the Houseblog with an update on the fireplace mantel, with some details on the top molding and the results of the weekend’s work. It’s coming together, people.
I’d also like to take this opportunity to send shout-outs to my lovely wife for her gift of a table saw last year, and my wonderful sister, who gifted me with a compound miter saw a few years back and the router two years ago. Without you both, this project would not have been possible. It’s a pleasure making stuff out of wood when one has the right tools, and while I don’t have the New Yankee Workshop setup, I have enough tools to produce something this nice. Thank you, everyone.
…Now, if i could only rip that ugly brass fireplace surround out of there and put something nice in its place…
When last we left the fireplace mantel, I’d finished adding wings to the sides of the box on top to make the structure look proportionally correct. The next step was to find molding of some kind that would fit the top of the box, mimic the molding in the rest of the house, and have it be approximately the right size.

This is the basic crown molding sold at Lowe’s and Home Depot, clamped into place for test-fitting and basic aesthetic testing. At first I had it lined up with the top of the box, so it began about 4″ down the box and (to my mind) was squishing the top box too much proportionally. My initial plan was to tack it into place here, then see if I could have a 3/4″ plank planed down to 1/2″ at a lumberyard somewhere and basically just tack it on top of the molding. This would have left me with a thick lip at the top of the mantle though—the squared top of the molding is about 1/4″, plus a 1/2″ board == eccch.

My second thought was to mill the sides of a plank down to fit the bevel of the molding (tip: all crown molding is essentially a thin board turned on its side so that it doesn’t create a 45° wedge at the back, which makes it undesirable for finishing the top of, say, a mantle) and fit it to the mantle, then tack the molding onto it and into the side of the box. This would be considerably more difficult but the end product would be much more pleasing.

Another thing to note is that with this particular crown molding, the angle at the back is not a perfect 45°; it’s somewhere around 32°, which makes fitting the bevel that much trickier. I cut the molding according to the measurements and test-fit it, then measured both the box and the outline of the molding to find the final edge size. (Sure, your fancy “New math” might have helped here, but remember, this house is out of square in five dimensions.)

Cutting the long edge of the plank was easy on the table saw, but cutting the short edges was tricky because my compound miter saw only has a reach of about 7″, and this board is 8 1/4″ wide. So I had to revert to the circular saw, adjusting the blade by guesswork and praying for good results.

And luckily, it seemed to work. I got true 32° cuts from the circular saw in a straight line, and fit the plank into place. Next, I had to jigsaw out the odd scalloped shape of the bumpout above the fireplace into the back of the plank—both edges come out about 1/8″ further than the center— and plane out any inconsistency left so that it fit as flush as possible.

The end result has a few very minor hiccups here and there, but overall looks very good, and turned out better than I’d dreamed it might. I have to cut and fit shims on the top to support the plank, and then the whole thing gets permanently fastened to the frame.
The next step is to cut down those small planks on the right side and fit them around the sides so that they meet the kickplates on the wall, covering up the lousy edging job the floor guy did around the fireplace and the lousy brickwork we inherited. Then, putty and caulk go in to fill any rough edges, a final sanding, and finish paint goes on.

Here’s the fireplace surround with wings on the edges. There are more pictures on the houseblog.