

Visiting Jen’s father this weekend in the LP City, I played hooky for a few hours and brought the big camera over to the Patuxent River Naval Air Museum to shoot some planes.
The museum is a curious collection of donations, acquisitions and working machinery, and they have a remarkable collection of hardware parked outside spanning fifty years of aviation history. I am always drawn to older designs, so I spent hours skulking around the oldtimers in the group, trying to find good angles and interesting subject matter. Ducking inside for what I thought would be a quick review of the exhibits, I was shanghaied by a friendly, garrulous older guide who showed me every nut, bolt, and rivet of the exhibits inside on an hourlong personal tour.
Back at the house, I pulled the last of the shelving down in the corner, exposing a pencilled note from the original workmen. The room was, as far as I can tell, finished out in 98° heat, on July 12 19(28?)
Then, I pounded all the nails out of the debris on the floor of the exam room and stacked it neatly in the garage for disposal. Tomorrow I’m going to swap filters in my aspirator and start pulling drywall and molding from the walls to see what’s underneath.
So here’s the basic idea for the remodeling. We’re going to do a phased approach so that the exam room is completed first, and then start work on the old offices so that the front porch space becomes one large office for our businesses. This way we can use that space effectively and reclaim one of the bedrooms upstairs, and we’ll add about 300sq. feet of usable, centrally heated space to the floorplan.
The bathroom downstairs will get reorganized so the toilet faces outward and the doorway opens out into a passthrough, as opposed to the bathroom being the passthrough. While we’re remodeling this part, I’m going to have a new chase and water lines run from that stack up through the wall to the atrium directly above, in preparation for conversion of that room into a master bath/dressing room.
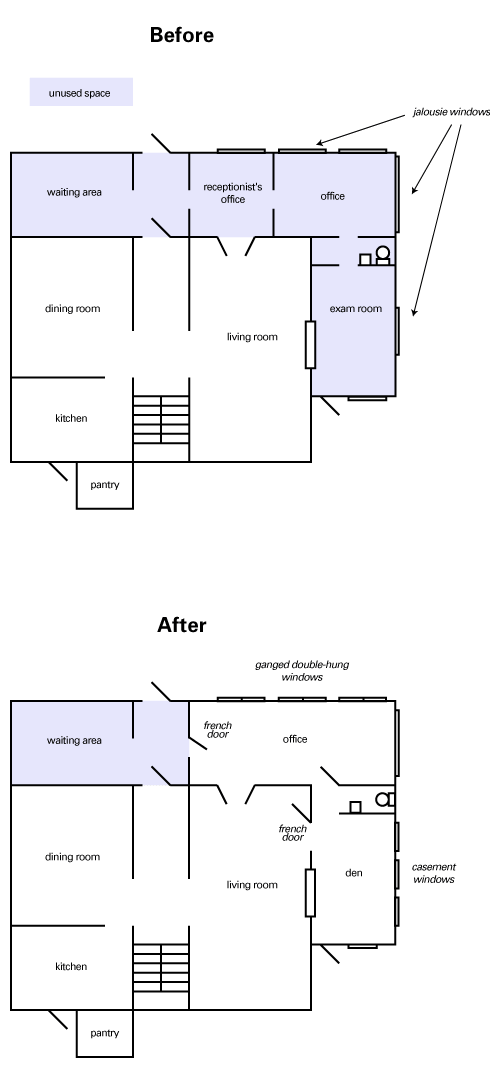
Simple, right?
(shudders)
A few weeks ago, I started demoing the shelves in the old doctor’s office, but several other things got in the way of finishing the job. Today the weather outside was shite so I took advantage of a free afternoon to continue working. In order to get anything done properly, I had to first move all the crap out of that room and reorganize it out on the front porch, which began with humping two steel flat files from one side of the house to the other. Then I busted out the socket set and started disassembling the exam table, which will eventually go out in the garage until we can get rid of it.
Once the room was cleared of most of the furniture, I finished pulling up the rest of the floor tile, which took about twenty minutes—most of the adhesive dried out long ago, so a nudge with a flat screwdriver was about all it needed. Then, half an hour with a good flat crowbar was all it took to get the rest of the shelves down.

We’ve been wondering what’s behind the drop ceiling and how bad the plaster looked, and now we know. The roofing problems that at one time afflicted the atrium above leaked down to the ceiling below, so there’s some staining evident. The men who hung the drywall were obviously drunk and in a hurry, because there’s little or no finishing work done anywhere. It’s looking like all of the drywall needs to come down, which is fine, because the whole room needs to get reinsulated anyway. And once the interior sheathing is down, it will be easier to cut holes out for new windows.

A long time ago, when I moved into my first house house, I found an old Cloverleaf Dairy cooler in the basement, and I considered myself lucky. I love the idea that a guy in a white suit drove a truck around the neighborhood and delivered dairy right to the doorstep.

For a long time, I stored charcoal briquettes in it, because I had noplace else to put them. It sat in my old kitchen for a while, and when we moved into the Estate, it sat out on the front porch, briquettes intact.
Recently, Jen did some research and signed us up with a local organic dairy that delivers to our neighborhood. They offer everything from milk and cheese to bread, poultry, seafood and coffee. Two weeks ago, we ordered some milk, cheese, and butter, and we got the chance to put our dairy cooler out on the front steps.

I’m happy to report the 2% milk is wonderful. It tastes almost as rich as whole milk. The half and half had a small layer of milkfat at the top when I opened it. The sharp cheese is the equivalent of extra sharp, and very tasty, and the butter is good too. And, by coincidence, I bought some bread from their partner bakery this weekend, and it’s delicious as well. We’re definitely continuing with the service—it’s all hormone-free and locally grown, which is something Jen’s gotten more and more interested in this year.
The best part: ordering everything online is just as easy as the sticker on the inside of the cooler says: DON’T FORGET. JUST LEAVE A NOTE.
One of the things I’ve loved about this leaky, creaky house we’ve called home are the warlbledy wooden windows it came with. Apart from the panes that have obviously been replaced due to baseball impact or misadventure, they all have the lovely bubbles, waves, and imperfections that mark century-old glass. Unfortunately, they also suffer from a fatal design flaw: The weight pocket on each side of each window is an open cavity which leaches our warm air outside.

Today I finally got the chance to install two Pullman window counterbalances, the first of what I hope are the solution to this problem. I’ve had them since early December but haven’t had the time to put them in. Here’s how I did it.

Seen here is what I have to deal with throughout the house: wooden casements hung with rope and pulley. Some are rope and some are chain; some windows have a mixture, and some casements have been opened to reattach the weights.

First things first.
I scored and pulled the sash stop molding off the window, exposing the whole front of the window and the nails securing the metal guide on each side. After I carefully pulled the nails along the front side of the guide on each side, I was able to coax the entire bottom sash forward, away from the casement, and put the guides to the side. After some convincing, I was then able to pull the rope out of the channel on either side of the sash (each side was secured with a toothed flooring nail, difficult to remove) and put the sash aside.

Now, here’s the first roadblock. As with everything else in this house, nothing is easy. Lots of other windows I’ve seen have had pulleys installed with visible and accessible screws for simple replacement. Why should ours be similar? As you can see above, there was nothing on the outside of the pulley that hinted at how to remove it. After some exploratory prying and bending, I was able to remove the left-side pulley and found that it was designed to be pounded in with a hammer at the factory, and held in place with teeth on the top and bottom.

Knowing this, it was then simple to bend the top and bottom of the casing and insert a long screwdriver to bend the teeth back. After that, the second pulley popped right out.

Of course, the hole left behind wasn’t large enough to fit the new pulleys, so I had to enlarge them vertically. I made three holes with a drill bit and then used a shiny new 7/8″ wood chisel bought specially for this job to clean up the hole. I did some test fitting for the body of the pulley and then chiseled out a mortise to countersink it flush to the casement. It’s ugly, but with a coat of paint, it’ll clean up well—I have to figure out how to make a rounded mortise with the next one.
Fun with fibers
Next was the boring part. Knowing I wasn’t going to pull the wooden molding off each window, I needed to find a way to get insulation into the cavity. These days, it’s possible to rent a machine and blow fiber insulation into your own attic (why anyone would want to do this themselves is a mystery to me) so I knew I could find the fiber on the consumer market. After some searching, I found it at at the local HD in a 20-pound bag, with the brand name Green Fiber. The nice thing about this stuff is that there’s no fiberglas in it, which makes it easy to work with. I made a wide funnel with some paper, taped it to the casement, and spent the next twenty minutes stuffing insulation into each cavity.

I predrilled holes and put both pulleys into place. From here, it was the reverse of what I’d started with: I attached each pulley tape to the channel of the sash with a sturdy wood screw, then slid each metal guide into the channel on the sides of the sash. Carefully guiding the whole thing back into the casement, I nailed the guides back into place and replaced the blind stop.

And there you have it. The window is in place, and the tape is just about perfect for a counterbalance—I’d say another added pound of pressure on each side would be perfect. It’s too warm outside right now to determine if it’s actually insulating or not, but we’re getting back down below freezing later this week. Total installation time was about 3 hours, but I could probably get that down to 2, maybe an hour and a half, if I could find a good fast way to get the insulation into the cavity. I’m going to do a test with my shop vac on reverse to see how well it might work (and how messy it might get). At $25/pair, window pulleys are a much cheaper alternative to replacing each window with vinyl, so I’m hopeful it will work.

After finally taking the time to listen to Jen, I pulled the top six shelves down out of the pantry and replaced them with deeper versions spaced further apart. Instead of spending lots of cash on new lumber, I recycled the shelves from the doctor’s exam room out on the porch, kicking off the process of remodeling that space. (strange factoid: the exam room was wallpapered with a fox hunting pattern at one point. Very, very strange.)

The original version of the pantry didn’t allow enough room for multiple stacked items, and the shelves were too shallow to hold more than a can and a half of food. The new shelves are double the depth and have two extra inches of height, so they should be able to hold anything we can think of.

Remember those pizza boxes on the back porch? Here’s the result. This was the morning after a 1AM installation session, where we had to move all the furniture into the dining room and jockey the white couch (the 4-ton sleeper) around the tiles as we laid them down. The result is a warm, comfy floor that brings a new color into the neutral space, and lightens up the whole room
Now, to get rid of that hideous brass fireplace surround.

I like to watch the Home & Garden channel to see house porn and get ideas for our place. It’s kind of a spectator sport sometimes, because the people featured on all of those shows have absolutely no taste. Here’s the setup: an otherwise normal looking couple has their house on the market for eight months, and they can’t understand why it’s not moving—could it be the fact that they’ve decorated it in Early American Frat House? Young couples who would ordinarily throw judgemental looks at me in the Starbucks live in condos that look like the bed of a municipal waste truck.
Then, some expert blows in, forces them to dispose of their stuffed animals and model train periodicals in a humiliating yard sale. Afterward, they throw the remaining furniture out, buy some window treatments, paint the place in colors other than white, and Voila! the house sells. Miraculous!
There are other shows, like the ones that feature flipping (how’s that working out for you this year?) and renovation, and I like to see what people have done with basket cases like ours. I steer clear of This Old House, which is made for WASP-y hedge fund millionaires who can afford to hire The Largest Crane In Connecticut to lift a barn over a pond, or install enough solar panels to light a municipality. I also avoid While You Were Out: even if you have the hottest carpenter on TV, a $1,000 budget will only get you cheap-looking custom furniture painted in one ugly color.
Mainly, I like to watch so that I can find solutions to problems that only this house presents. What do I do if I have no heat in my kitchen? How can I replace a slate roof without declaring bankruptcy? Where can I find replacement valves for my radiators?
Usually I’m disappointed because these programs are only interested in answering easy questions, like which end of the hammer hits the nail? But once, I saw something that got me excited.
For the last couple of years, I’ve been back and forth as to whether I should start replacing all the windows here at the Estate with vinyl, or find some way of making the existing windows better. A few weeks ago we had a guy come and quote on new basement windows, and on a lark had him quote separately on the dining room windows (which are long past saving). Surprisingly, the price was reasonable—much less than I’d guestimated.
As it suddenly got cold outside, I kicked around the idea of going room by room with vinyl. This place seems to have gotten draftier with each passing year, even in the rooms where I’ve scraped, repainted, and recaulked the storm windows. Where we’re losing the heat is in the weight pockets on either side—a 6″ deep cavity covered by two bare pieces of ¾” thick wood, hardly an energy efficient solution.
Vinyl sucks, though. It’s ugly. I like the warble in our existing windows, which were built in the days when glass was still imperfect and contained lines and bubbles. I like the look of wood. And the two vinyl windows that predated our arrival are cheaply made and already discolored. Plus, some botoxed “realty expert” on one of the house programs said that buyers don’t like vinyl, and are looking for natural wood windows wherever possible. This statement got me to thinking, but I took it with a grain of salt, only because the program was filmed in Southern California, where their idea of cold weather attire is long pants and a warm macchiato.
A couple of years ago I saw something on one of those programs, and dug around to find it online: the Pullman Manufacturing Company, who make a product called window balances. Essentially, it’s a spring-loaded cord that fits into the pulley pocket used by sash weights. Cut the weight cord, pull out the pulley roller, and replace it with the window balance, then attach the end of the cord to the bottom side of the window, and there’s no need for weights anymore—which means the void can be filled with insulation (somehow).
I missed the sales rep this afternoon, but I’m calling tomorrow to buy four. I’m going to test it out in the living room to see how much of a difference there is, before I make a final decision on vinyl.

Our friends Nate and Kristen just had their kitchen remodeled, and before demolition, they offered us two built-ins that came with the house. Never one to turn down another time-intensive project, we selected the smaller of the two, which was the top of a hutch. This piece has two solid three-pane doors with good brass, and the wood is hard (pine? poplar?) with a nice grain and no knotholes: perfect for a bookcase or even a buffet.
I got the entire outer shell heat-gunned and sanded yesterday, and about 1/3 of the lower shelf to see how thick the interior paint is. Both of the shelves actually come out, so doing the interior will be less work than I’d thought. Then, I have to knock the glass out of the doors and strip them carefully (windowrames are the worst) before we can start testing stains. Hopefully I can get it all sanded by Thanksgiving.
I would have had a ‘before’ shot here, but I forgot to switch the settings on my camera at first, and they’re all blown out.