
I did some minor fooling around with the Scout today while the weather was warm. One of the easiest things to accomplish was swapping out the windshield wipers. I used ANCO 5913′s, which come with a bolt and nut ready for mounting (Thanks, Mike Moore!). All I had to do was pull the old blades and grind the rivet off with a multifunction saw, and bolt the new blades on. Make sure your kits have the nut included; one of mine didn’t. I had to use a 1/2″ 14/40 bolt and a locknut from my bench stock to hook up the second blade.


Then I pulled the dash bezel off to try and get the radio working again (turned out it was the ground wire, which we had disconnected when we were diagnosing the fuel sender issue back in the fall). Wile I was in there I pulled both purple-painted light bars out and replaced them with clean spares.Then I tried getting the speedo out to replace some bulbs, but couldn’t get it to come through the dash cutout, so I gave it up and put everything back.
→ This is a syndicated post from my Scout weblog. More info here.

We had a workday north of Baltimore the last week in October, and I was lucky enough to have about five sets of hands helping diagnose my fuel sender issue. What we were able to sort out is as follows:
- My wiring loom up to the bulkhead is not original, but contains original green wiring.
- The ground spade on the sender wasn’t connected (it must have come off at some point after we installed it) but it is now.
- The sender is working properly. We tested it for resistance and it works when we slosh fuel around in the tank.
- The PO put in a grounding wire directly to the frame, which I cleaned up with some sandpaper.
- The wire going up to the bulkhead connector works.
- The bulkhead connector is a mess, and has been screwed with quite a bit.
- Everything behind the dash is a mystery.
The service manual says we’re looking for wire 36-16, which checks out behind the dash but the wire going from the sender through the loom looks like 11. Additionally, the 11 loop (the one which appears to ground on a stud welded to the backside of the dashboard) was loose, so I reconnected that.

While I was there, I bought a Thermoquad from Jason H. for tinkering (it’s the one on the left; the one on the right will get rebuilt as my spare).
→ This is a syndicated post from my Scout weblog. More info here.
One of the things I pulled off the junkyard Traveler last weekend, almost absent-mindedly, was the door rubber from both sides. I wasn’t even thinking about it when I first saw the truck, but as I worked around and inside the cab, I realized it was in very good shape. I’ve been looking for something to cut down on the door rattle on both sides, and having the air leaks plugged when the traveltop is on would be fantastic. I’ve got a set of rubber that came with the top I bought in the spring, but that’s all in one piece and I don’t want to cut it. This set looked great except for a few spots where it had deformed, so I didn’t feel bad about chopping it into smaller sections. I put a vertical strip down the A pillar from the top of the windshield to the dogleg and cut another vertical piece for the B pillar. The lip along the floor is still intact in some areas but there isn’t enough to justify covering it, so I left it. The driver’s door closes perfectly, but the passenger door, which has always been problematic, refuses to shut at all now due to the way it’s hung– inboard and toward the rear of the truck. The rubber is too thick between the edge of the door and the bottom of the A pillar. At some point I’m going to have to adjust it to fit better if I want door seals.
I ordered a set of thin stainless locknuts from Fastenal before our vacation and they arrived today. The replacement hardware I installed on the soft top bows works great, but the locknuts were just a little too fat to let the threads on the bolt reach the nylon, so they kept rattling themselves off. (Brian H. found this out the hard way on our way back from Mt. Airy this weekend). The new set works perfectly, allowing the bolts and bows to move freely but fasten tightly.
→ This is a syndicated post from my Scout weblog. More info here.
Sunday morning I got up early, helped get Finn fed, and then hustled outside to get to work. Brian T. drove all the way out from Chestertown with his compressor and we sanded, scuffed, cleaned and taped off the whole truck. As I was finishing up some final scuffing, Brian looked up from the liner kit and said, “I think we have a problem.” Al’s Liner is a 3-part system, the first of which is an adhesion primer that came in a plastic bottle. My cursory check of the kit last week failed to reveal it had frozen solid after two years in storage. Being a specialty kit, nobody open on Sunday has it in stock, and all the other commercial liners are 2-part systems. Grudgingly, we wrapped everything up under plastic. I’ll call first thing tomorrow and see if they can overnight me a new bottle, in which case I’m going to try and shoot it on one night this week. I hooked up a trio of lights under the tent that should provide enough coverage to see the whole thing.

After everyone took off, I took Finn swimming in the neighbors’ pool and drank a beer to cool off.

Many thanks to everyone for their help this weekend- both Brians went above and beyond and I never would have made it this far without their help.

→ This is a syndicated post from my Scout weblog. More info here.
A few months ago, I took off a Friday from work so that I could put in a three-day weekend installing bedliner on the Scout. With the help of some excellent friends and a lot of hard work, I got it very close to completion.

Friday morning I pulled the truck out and attacked it with sanding discs. Much of the paint on the bed came off quickly and easily. Both front seats came out as easy as the day they were installed, which was shocking. I’d replaced all the rollbar hardware with Grade 8 bolts, so I knew that would come out without a problem. I’m going to have to use a ratchet strap to pull the feet together just a hair before it goes back in; the mounting plates scuffed the paint on the walls when I pulled it out.

As I got closer to the front, the PO’s paint job got thicker so the going got slower.
This is what I found when I ground the bolts off the metal strip holding the weatherstripping down. There was carpeting underneath, which leads me to believe these had never been taken off before. I ground the bolts down to the floor and cleaned out each hole with the vacuum.

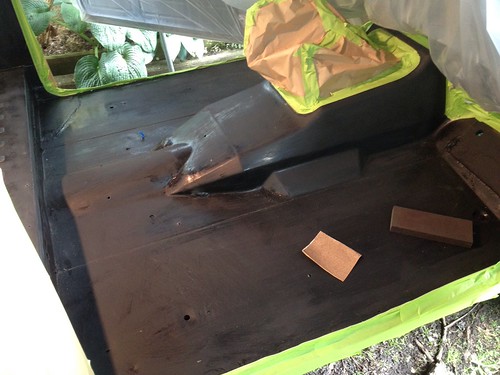
After Brian H. came by, he dug in and helped me make short work of the front floor and the remainder of the tub:

Once the paint was off, we used Marine Clean and Metal Ready to prep the bed, and then rolled it into the sun to dry out. Then it was time to paint:

Here’s where we ended up at 7PM this evening. If Brian hadn’t come over, I definitely wouldn’t have gotten this far.
→ This is a syndicated post from my Scout weblog. More info here.
So the snaps I bought from West Marine last fall have proven to be pretty worthless. Only one out of a total of twelve will stay connected for more than ten minutes; the brass rings inside the cap section just don’t hold well enough.
I did some research online and plugged some new search terms into the Googles; I came upon a commercial manufacturer who makes Milspec snaps and then a distributor who sells them by piece. They showed up yesterday and they are as strong as advertised. A test with the install pliers I got with the West Marine kit was successful, but I think I’m going to use the punch I got in a repair kit from Kayline years ago.

I got 20 11/64″ snap button barrels, 20 sockets (hard action), and 20 3/8″ #8-32 machine screws. “Hard Action” sounds sexxxy but only means it takes a lot of force to get the snap to connect and release. So now the screws will face inside and the door flaps will fold underneath and snap to the inside of the door frames.
Update: The punch worked perfectly. I’m short two nylock nuts for the passenger side but everything is installed and the snaps hold the way they should. Problem solved!
→ This is a syndicated post from my Scout weblog. More info here.
Another thing I got to this weekend while Finn was asleep was to pull out the A/C ductwork under my dashboard. It was inoperable when I got the truck, although there was power to the blower fan. There was no compressor on the engine and the supply/return hoses had been cut just outside the firewall. Figuring it would be a number of years and several Lotto tickets before I’m able to buy an aftermarket A/C system, and because I’d like to get under the dash itself to replace bulbs and fix electrical gremlins, I decided to yank it out.

The vent bar came out easily (in part because one of the bolts was already missing) and the PO had thoughtfully installed quick connects on all of the wiring. Once that was out, I tackled the condenser unit under the passenger’s side. This was trickier because my glove box latch is hopelessly broken, so I jimmied that open, removed the box liner, and pulled the door off. There are four bolts holding it onto the firewall, three in the wheel well and one in the engine bay. They all came off so easily I had to look around to see if anyone was pranking me.

Once that was disconnected and the hoses underneath came off, the whole assembly lifted right out. It’s definitely seen better days. The picture here doesn’t show five pounds of dog hair and mud caked into the rear of the condenser unit.

Now I can get underneath and sort out the wiring, replace all the bulbs, and (possibly) even pull the purple dash off and replace it with the black one I refinished four years ago. But I’ll have to be careful not to anger the Scout electrical gods.
→ This is a syndicated post from my Scout weblog. More info here.
Our friend Mike, out in Colorado, put together a site for his Scout project. He’s a lot deeper into his project than I am into mine (by that I mean total restoration) and he’s got a ton of great pictures documenting how he’s doing things. A recent post on his steering column rebuild has me dreaming of a turn signal that cancels correctly…
In other news, one of the smaller things I picked up on Sunday was an incomplete set of rollbar pads. Due to their age and exposure to the elements, the zippers on both downtubes were frozen stiff, but the crossbar and rear arm pads came off with a little coaxing. The zippers are all pretty rough and some are missing teeth, but for $10 I figure I can have new zippers installed and buy some crash-rated foam to replace what they came with.

Last night I used an old trick for fixing the zippers: I rubbed them liberally with candle wax until I could get all three to catch and zip. I think I’m going to have Jesse cut the other two off for me and set them aside, so that I can have a full set to work with.

→ This is a syndicated post from my Scout weblog. More info here.
Our friend Mike, out in Colorado, put together a site for his Scout project. He’s a lot deeper into his project than I am into mine (by that I mean total restoration) and he’s got a ton of great pictures documenting how he’s doing things. A recent post on his steering column rebuild has me dreaming of a turn signal that cancels correctly…
In other news, one of the smaller things I picked up on Sunday was an incomplete set of rollbar pads. Due to their age and exposure to the elements, the zippers on both downtubes were frozen stiff, but the crossbar and rear arm pads came off with a little coaxing. The zippers are all pretty rough and some are missing teeth, but for $10 I figure I can have new zippers installed and buy some crash-rated foam to replace what they came with.
Last night I used an old trick for fixing the zippers: I rubbed them liberally with candle wax until I could get all three to catch and zip. I think I’m going to have Jesse cut the other two off for me and set them aside, so that I can have a full set to work with.
→ This is a syndicated post from my Scout weblog. More info here.
Here’s a fantastic rundown of information about rebuilding Thermoquad caruretors from the Binder Planet, with part numbers. The important stuff:
1. Rebuild Kit. I use a GP Sorensen part number 96-246C kit, costs approx. $37.
2. Floats. I use two GP Sorensen part number 779-1726. These are nitrophyl floats. I have found that the brass floats sold for the T-Q will fit the fuel bowl, but are not the correct shape to work properly and could not be adjusted to work properly. The Nitrophyl floats work quite well. Good ones weigh 7.5 to 8.0 grams.
→ This is a syndicated post from my Scout weblog. More info here.