

So Brian and I finally got our schedules organized to move the spare engine out of his backyard. First we had to borrow Bennett’s engine hoist, which meant disassembling it and fitting it into Peer Pressure, then driving that over to Brian’s. Then we had to build a ramp to coast the engine and cart down off his patio, onto grass, and then onto the driveway. Then we rebuilt the hoist and raised the engine.

Then we scooted the Scout under it and ratcheted it down with four straps.

The engine hoist got broken down and shoved into the back of Brian’s Prius. I drove gingerly up 95 to the house, backed in, and we reassembled the hoist.

Then we muscled the engine and cart up into the garage, got the hoist inside, and attempted to mate it to the Harbor Freight engine stand I’ve had for 8 years. We got three of four bolts to mount but when we let the hoist drop the whole stand leaned frighteningly forward. So we put it back on the cart and called it a day.

So, I’ve got some reading to do. I think I’m going to start with some basic engine rebuilding books and go from there. But for now, I’m resting my back.
→ This is a syndicated post from my Scout weblog. More info here.

One of the things I pulled off the junkyard Traveler last weekend, almost absent-mindedly, was the door rubber from both sides. I wasn’t even thinking about it when I first saw the truck, but as I worked around and inside the cab, I realized it was in very good shape. I’ve been looking for something to cut down on the door rattle on both sides, and having the air leaks plugged when the traveltop is on would be fantastic. I’ve got a set of rubber that came with the top I bought in the spring, but that’s all in one piece and I don’t want to cut it. This set looked great except for a few spots where it had deformed, so I didn’t feel bad about chopping it into smaller sections. I put a vertical strip down the A pillar from the top of the windshield to the dogleg and cut another vertical piece for the B pillar. The lip along the floor is still intact in some areas but there isn’t enough to justify covering it, so I left it. The driver’s door closes perfectly, but the passenger door, which has always been problematic, refuses to shut at all now due to the way it’s hung– inboard and toward the rear of the truck. The rubber is too thick between the edge of the door and the bottom of the A pillar. At some point I’m going to have to adjust it to fit better if I want door seals.
I ordered a set of thin stainless locknuts from Fastenal before our vacation and they arrived today. The replacement hardware I installed on the soft top bows works great, but the locknuts were just a little too fat to let the threads on the bolt reach the nylon, so they kept rattling themselves off. (Brian H. found this out the hard way on our way back from Mt. Airy this weekend). The new set works perfectly, allowing the bolts and bows to move freely but fasten tightly.
→ This is a syndicated post from my Scout weblog. More info here.

Bennett and Brian were headed up to pick over a Traveler in a junkyard in Mt. Airy today, so I tagged along. It was already gone through pretty well, but after a few hours of effort, we got the right inner fender, driver’s door, power steering pump, and some other goodies off it. I grabbed the starter, a hub assembly, the oil pump, both valve covers, some decent door rubber, and a very clean headlight switch, among other things. Now we need to figure out how we’re getting the engine from Brian’s house to my garage.
→ This is a syndicated post from my Scout weblog. More info here.

I picked up a pair of Grade 5 bolts for my steering wheel puller yesterday, along with 3′ of 3/8 fuel line and a rattlecan of International Red farm implement paint while I was there. Hopefully I can get some time this weekend to replace the wheel. The fuel line is for my Hydroboost setup and the paint is for the new engine, if and when I can get it here.
→ This is a syndicated post from my Scout weblog. More info here.

I’ve had the liner in for a total of two weeks, and here’s my report.
- Don’t let it get too old. I’ve had this kit sitting in a climate-controlled cool, dark corner for two (three?) years while I got my act together to spray it in. In that time, the primer hardened to a solid in the bottles, the main component skinned over about 1/2″, and the black activator component looked like it was beginning to go bad. The folks at Al’s were very helpful and suggested I buy more activator when I ordered replacement primer. When I got the order they even threw in a spraycan of mold release, which helped when cleaning the spray gun out (the excess basically peels right out).
- Mix it really well. I used the mixing attachment they supplied with the kit, which probably works fine for brand-new materials, but I could have used something with a wider paddle to really get things mixed well. I sprayed the primer on the bed as instructed and then mixed the first batch of liner. When I test-shot it on some spare door panels, I got a white foam for the first 30 seconds or so and then the liner started coming out–some of the C component may have been bad as well. This was after 5 minutes of mixing. My liner looks good but there are little boogers here and there where the main component hadn’t dissolved all the way, and they’re still sticky.
- Dial the pressure in early. The pressure on my compressor was set very low to begin with (around their recommendation) and I got a very thick, gloopy spray at first. It was so bad that I was getting random puddles in different areas as I tried to clear the nozzle. I shot about 1/2 the hopper worth of liner before I got wise and increased the pressure, and at that point the spray went on smoother. I’d also recommend having a thick-nap roller handy to smooth out the puddles; I wasn’t thinking ahead that far but in hindsight it would have made a big difference.
So it’s in; I’m relatively happy with the results but I wish I’d had more time to experiment with the compressor and think through the application.
→ This is a syndicated post from my Scout weblog. More info here.
At Carlisle this weekend, I picked up my new Rallye steering wheel from Mike Moore. We fooled around with it a little bit at the show, going so far as to buy a $6 wheel puller at a tool tent and pull the cover off my current wheel. Where I stopped was when we compared the guts of the full-size wheel to the Rallye wheel; there are two wire leads entering my current wheel, one for a ground and one for power to the horn.

The Rallye wheel has one obvious connection point for what I’d assume is power at the 12 o’clock position; there is no other lead on the plastic at all.

I started looking through the Binder Planet to see if anyone else has blazed a trail for me to follow, and found this Steering Wheel Replacement thread with a link to some more pictures which illustrate how to use the wheel puller. It also reveals that I’ll need to get two 1/4″ x 28 thread bolts to fit the pull holes; most likely the ones I have are metric. This thread is even more helpful, as it’s got commentary with excellent pictures.
What I’m gonna have to do is pull my current wheel apart and dick around with it for a little bit to see if what I have will work with what I bought. If not, it’s a call to Super Scout Specialists for the stuff I’ll need.
→ This is a syndicated post from my Scout weblog. More info here.
Sunday morning I got up early, helped get Finn fed, and then hustled outside to get to work. Brian T. drove all the way out from Chestertown with his compressor and we sanded, scuffed, cleaned and taped off the whole truck. As I was finishing up some final scuffing, Brian looked up from the liner kit and said, “I think we have a problem.” Al’s Liner is a 3-part system, the first of which is an adhesion primer that came in a plastic bottle. My cursory check of the kit last week failed to reveal it had frozen solid after two years in storage. Being a specialty kit, nobody open on Sunday has it in stock, and all the other commercial liners are 2-part systems. Grudgingly, we wrapped everything up under plastic. I’ll call first thing tomorrow and see if they can overnight me a new bottle, in which case I’m going to try and shoot it on one night this week. I hooked up a trio of lights under the tent that should provide enough coverage to see the whole thing.

After everyone took off, I took Finn swimming in the neighbors’ pool and drank a beer to cool off.

Many thanks to everyone for their help this weekend- both Brians went above and beyond and I never would have made it this far without their help.

→ This is a syndicated post from my Scout weblog. More info here.
A few months ago, I took off a Friday from work so that I could put in a three-day weekend installing bedliner on the Scout. With the help of some excellent friends and a lot of hard work, I got it very close to completion.

Friday morning I pulled the truck out and attacked it with sanding discs. Much of the paint on the bed came off quickly and easily. Both front seats came out as easy as the day they were installed, which was shocking. I’d replaced all the rollbar hardware with Grade 8 bolts, so I knew that would come out without a problem. I’m going to have to use a ratchet strap to pull the feet together just a hair before it goes back in; the mounting plates scuffed the paint on the walls when I pulled it out.

As I got closer to the front, the PO’s paint job got thicker so the going got slower.
This is what I found when I ground the bolts off the metal strip holding the weatherstripping down. There was carpeting underneath, which leads me to believe these had never been taken off before. I ground the bolts down to the floor and cleaned out each hole with the vacuum.

After Brian H. came by, he dug in and helped me make short work of the front floor and the remainder of the tub:

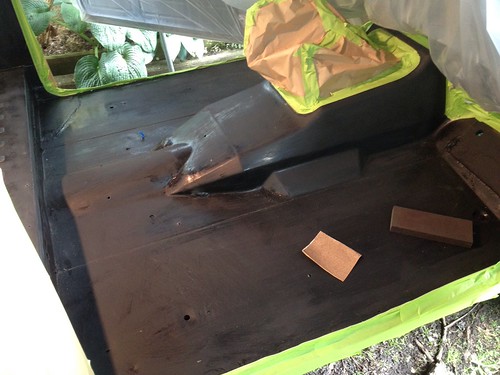
Once the paint was off, we used Marine Clean and Metal Ready to prep the bed, and then rolled it into the sun to dry out. Then it was time to paint:

Here’s where we ended up at 7PM this evening. If Brian hadn’t come over, I definitely wouldn’t have gotten this far.
→ This is a syndicated post from my Scout weblog. More info here.