
The exhaust leak on the passenger side manifold has been getting progressively worse, especially as I’ve been putting a lot of miles on the girl this summer. I’m not the kind of guy who needs a loud truck to announce who I am; I figure the unconventional look of the truck covers that pretty well, and I’d honestly prefer to have a quiet sleeper under my right foot than a Harley. So I ordered a couple of different gaskets from the interwebs and got to work this morning after breakfast.

My plan was to leave the back bolt in place, as I can’t really reach that without major effort and lots of cursing, and use leverage on the front bolt to snug the assembly together after the new gaskets were in place. I used a set of tin snips to cut a notch through to the bolt hole on one side, and worked it into position. When that was done I replaced the outside fine-thread copper bolt with a new coarse-thread Grade 8 bolt and snugged it tight. There’s just a hint of exhaust leaking from the front of the connection now but the BRAP-BRAP-BRAP from that side of the engine at throttle is gone. Hallelujah.
While I had the wheel off and the starter exposed, I pulled it off and removed the shim that’s been on there since I got the truck (and through about six different starters). Due to differences in the manual bellhousing vs. the automatic, the shim isn’t required for manuals—something I wasn’t aware of until recently. So with that buttoned back up and the wheel back on, we did a spin around the block and I basked in the (relative) silence.
Now I’m looking at both a felt kit for the windows and some of those sexy new rubber gaskets for the butterfly windows; both sides rattle and leak and I’d love to get things buttoned up tighter with colder weather here. Among each of the four sets I have available, the only good pair is the one on the truck—so I’d have to pull things apart or weld a spare set back together before updating the rubber.
→ This is a syndicated post from my Scout weblog. More info here.
I took the day off from work to burn through vacation time before I lose it on October 1, and after my original plan for the day fell through I decided to tackle the windshield project. As it turned out, I’m glad I had the full 8 hours, because I wound up needing it.

To recap, I had a new windshield frame prepped and ready to go, because I had no idea what condition the frame on the truck was in. I might pull the gasket off and find the metal held together with Ritz crackers and wood glue. I had a new gasket ready and a clean, clear windshield from the Flintstone Scout waiting in the basement. Having pulled that glass from the truck only last year, I was familiar with the process, and all it really took was a utility knife. After cutting the lip off the gasket, I was able to push the glass outward just hard enough to get it free and put a crack right down the center. Oh well; I’m never using it again anyway. With a deep breath, I pulled the gasket off to find that the metal really wasn’t bad at all. In many respects this frame is the best of all three that I have—there were only two small holes on the driver’s side right below the channel, and the only crusty part of the lip was right above them. The rest was mainly just surface rust, and after masking things off I hit it all with the wire wheel and then some Rust Encapsulator.

Next up was mounting the gasket. This took some patience and a roll of painter’s tape, because once I’d gotten the bottom started the top didn’t want to set up correctly. I worked on it for a while and took a break with one area on the passenger’s side to go. After a snack and a pee break I came back out, looked at it a little differently, and got it in place in about five minutes. I’m glad I had the spare and took time back in May to practice on it, because it did take a while to understand exactly how it mounted to the frame.

Now to the hard part. I carefully laid the new glass in place along the bottom and eased it into the channel, then started working the edge into the gasket up the driver’s side. All of the videos and instructions say to use a special rope that has a certain amount of friction to sort of pull the gasket into place; I didn’t have that rope. I found that paracord did not work well—it was too slippery and the glass seemed to shave fiber from the edge of the cord. What I did have were a set of pallete knives I use for scraping, which have rounded edges: perfect for pushing on rubber without cutting it, and wide enough that they could handle a lot of material. With more patience and liberal application of soapy water, I got the driver’s side vertical started and up to the top horizontal section, where I stalled out again.

After some lunch I came back out and rethought the situation. Using the pallete knives I pushed on the rubber while adding careful pressure to the glass to get it to sink into the gasket as I moved to the left. It took some practice and there were some frightening moments where I was sure I was going to crack the glass, but I got the passenger’s side vertical into the gasket and then slowly pushed the glass into the top section until the gasket captured it all with a quiet “thup”.

This gasket has an integrated locking loop, which took more soapy water and the pallete knife to tackle, but that went relatively quickly compared to everything else. I ran out to the store for some rearview mirror glue, and popped the mounting puck off the old windshield with careful application of heat from a propane torch. When that cooled off I glued it in place and washed the windshield down with Windex.

I started at about 9AM and had the glass settled and sealed by 3:30; it took an hour to go get the mirror glue, prep it, and install everything (it needs time to cure on the glass). On the road, it’s a completely different story. The glass is clear and bright; the setting sun doesn’t turn everything opaque, and at night the lights from oncoming cars don’t become blinding. It’s like driving a new truck. After fourteen years of squinting through a vaseline-covered lens, it’s an incredible upgrade, something I should have tackled years ago. I’m glad I finally took the time to think it through and prepare for it properly.
→ This is a syndicated post from my Scout weblog. More info here.
Owning an antique vehicle requires keeping a number of lists. There’s the standard to-do list; there might be a list of parts sources, a list of trusted mechanics, maybe a mileage or expenditures list, and several how-do-I-do-this-again lists. I’ve got all of these plus about twenty more, and one of them is the why-did-I-forget-about-that list. This list contains all of the dumb little things I should have handled ten years ago when I first got the truck, or stuff I realized was broken years ago and have never gotten around to working on.
One of these forgotten things popped up last night on my way home from Southern Maryland last night. I had the top down and was driving home at freeway speed around 9PM in shorts and a T-shirt. Now, I’m not the biggest of guys—through some freak of genetics my BMI is still exceptionally low at this age, so I don’t retain heat well. By 9:30 I was pretty chilly. I had the chance to put a long-sleeve shirt and a windbreaker on at a red light but my legs were cold. Ordinarily it would be a very easy thing to turn the heat on, right? Well, not in Peer Pressure.

See, the valve controlling the heater core has been almost frozen shut since I’ve had the truck. I could get into the engine compartment and open it with a pair of pliers—which is how it stayed through most winters—but it’s not optimal for September days when the daytime temps are in the 80’s and the nights go down to the 50’s. Having it finally be adjustable from the cabin would be great. I drove home with a blanket on my legs for part of the drive, swearing that I was finally going to handle the situation this weekend.

I’ve had a new valve handy since I refurbished the heater core, so today I took about fifteen minutes to pull the old valve off and replace it with the new one. The hardest part was loosening the hoses from the old metal parts, but with a pair of pliers and a nut driver it swapped in pretty easily. Now the lever on the dashboard opens and closes it with ease; I should be in much better shape this fall.
Meanwhile, the Duplicolor I ordered specifically this weekend suddenly got delayed, so I can’t paint the windshield frame over the long weekend like I was hoping. I’ve got primer and sanding pads here ready to go, so I can prep it ahead of time, but I would really like to get color on it before it starts getting colder, and work toward getting the new glass installed before October.
→ This is a syndicated post from my Scout weblog. More info here.
I’ve been noticing the stitching on my $50 soft top coming apart above the rear flap for a couple of weeks now, and it’s been accelerating. Where it started out at an inch long, it’s now about a foot and a half long and getting worse. Some of the threads have rotted and are giving way, but some of the canvas is ripping as well. I decided to pull the whole thing off and switch it out for the dark brown top from Chewbacca for the rest of the summer until I figure out a way to repair it.

This is the first time I’ve had this top on this truck. It’s a snap model like the tan top, so it’s a simple switch. But there are differences in the design—this one is clearly an early production version while the tan top is newer. The main differences are around the front windows; on the tan model they sewed a set of padded baffles over the top of the windows so that rain wouldn’t drip inside the cab. The flaps that fold under the window frames are smaller and have less velcro surface area. And there aren’t any straps built into the back corners to hold the top down to the body.

It’s not very pretty. The color combination isn’t to my taste, but the top itself is in excellent condition. I’ve got some spare nylon strap and quick-release buckles left over from my last repair job, so I’m going to make another set of straps for this one. Finn and I took it for a test run this afternoon and the velcro held up fot ten minutes at 65mph, which is more than I can say for the other two tops. But if need be, I’ve got enough mil-spec snaps to modify the flaps like I did with the other two.
It’s hard to believe I’ve gotten this much use out of these tops—all three of them are over 20 years old and showing their age. But with some careful repairs I think I can get a couple more years out of them.
→ This is a syndicated post from my Scout weblog. More info here.

I had some time to tinker on Saturday, and I got tired of tripping over a big box in the basement containing my windshield gasket. Naturally, I saw this as a sign and brought it out to do a test-fitting. I’ve always been confused as to how this thing gets installed, as it’s a huge circle of rubber with the weight of a Burmese python and the cross-section of West Virginia. Which side is up? Which flap do you fit into the groove on the windshield?
I did some tinkering, looked at an old video I’d saved, and finally solved the puzzle: the flattest, squarest section is in the back (facing the passengers) while the part with 17 folds goes in front. Once the glass is in place, one of those folds tucks down into another fold and forms a self-sealing lock, holding the glass in place.

This was also a good time to make the call on which frame will be the replacement: It’ll be the darker gold frame, which has less rust around the inside lip and elsewhere. I’m going to try to repair some of the rust damage on the lip when I get a welder, and then I have to figure out how to paint it before it goes on. But that would be an excellent project for the summer (and long overdue).
→ This is a syndicated post from my Scout weblog. More info here.
The weather on Saturday was 70 and sunny, so I decided to tackle the turn signal canceler not he steering column. I’ve previously covered how I pulled apart my spare column but this time I took more pictures, and I’ll repeat it here. The only difference between that column and this one is the shape; my spare has a round horn button while the one on Peer Pressure has a larger triangular horn button.
First, park the truck with the wheels pointed straight. Now unscrew the horn cover: it’s a two-piece mount. There are six screws on the backside that need to come out. From there you should be able to pull it off and see the mount:

Pull the horn leads off (you did disconnect the battery, didn’t you?) and pull the three screws visible out. The mount should come off, leaving this:

Next, unscrew the locking nut off the center bolt (it’s already out in the picture above). Use your steering wheel puller to get the wheel itself off: screw the two long bolts into the holes at 1 and 7 o’clock above, put the center bolt on the head of the nut, and start cinching down.

With that off, you’re looking at the plate that holds all of the guts in place. You need a different tool now to push it down and expose a lockring on the center of the stem. I built my tool out of some steel bar and bench stock bolts:

Use a couple of small flathead screwdrivers to widen the locking enough to slide it up out of the groove, and then slide it off the stem . The plate should come off easily then. You’ll see the turn signal canceling cam:

There should be a post holding a spring sticking out of the cam. Grab the spring and pull the cam off. (The post on mine was cracked and broken; this could be why mine wasn’t working).
From here you’ve got to unscrew both the turn signal lever at 9 o’clock and the hazard button at about 4 o’clock. Next, there are three bolts that hold the entire lever assembly in place—you’ll have to use the selector to move the assembly to reach all three.
Now, scoot down below the column and find the wire harness on the right side. Carefully unclip the smaller section of the two from the larger with a flathead screwdriver and push it aside. The entire lever assembly should now be free to pull up through the column. Take note of how it snakes down through the collar and mount, because you have to feed the new one through the same way.

Visually, there isn’t anything wrong with my stock harness. The plastic isn’t completely exploded like the spare was; I have no idea why it wasn’t working correctly, but I suspect it had something to do with the cam being broken. I did notice there’s a spring missing at about 9 o’clock in the picture below, which I never found in the column. Regardless, I fed the new one down through the mounts and clipped it back into place on the column.

Then, I used some steel wool to clean the rust off the turn signal lever and put that back in place.

From there, it’s just reassembling what you just took apart, in the right order. Remember how you parked with the wheels straight? make sure you align the wheel up correctly (I aligned mine in a Y shape so that I can see the dashboard through the top of the spokes).
Hooking the battery back up, the truck roared back to life, and both of the turn signals now cancel as advertised! My days of puttering along in the middle lane with my blinker on are (hopefully) over with.
→ This is a syndicated post from my Scout weblog. More info here.

While babysitting a brisket on the smoker Saturday morning, I took an impact gun out to the garage and separated the hardware from the cushions on the black bench seat I’d bought a couple of weeks ago. The hinges were all pretty beat up so I figured I’d put them in the blast cabinet and clean them off, then wire wheeled everything to get it ready for paint. It took a little doing but I was able to punt the pin out on the latching mechanism to add some tension back to the spring. With that done I hung the parts in the garage and hit them with etching primer. They’ll sit and cure for a couple of days before paint, and in a week or two I can reassemble the bench and get it ready for installation.

I also wire wheeled the locking ring on the old steel gas tank, then used a hammer and screwdriver to spin it free. Pulling the old fuel sender revealed a rusted, corroded mess that looked like it had been dropped and “repaired” with a homemade filter at some point. Both electrical contacts looked completely shot, and the wire wasn’t even attached. Inside the tank looks remarkably clean—there’s a remanufacture label on the outside, and the inside is coated with some kind of sealant. I think it should be pretty easy to drop the plastic tank and replace it with the original, and hopefully I’ve got a usable rubber seal left on the plastic tank—that sender is only six or seven years old and should be just fine. I cleaned up the metal ring on the tank and hit it with some rust encapsulator. And the outside of this tank has a date with the wire wheel and some spray-on undercoating before I worry about swapping it out.
→ This is a syndicated post from my Scout weblog. More info here.
I got a big box from IH Parts America this week with two key items: a new windshield gasket and a turn signal switch assembly. I’ll have to drag one of the spare windshield frames into the basement and practice putting it in with the lesser of the three spare windshields I’ve got. It’s definitely a warm weather project but I’m excited to finally upgrade from my rock-tumbled ghetto glass.
At first glance the turn signal part is exactly the same as the one in my spare steering column, so I got back to rebuilding the spare column.

When last we left my steering wheel teardown, I’d been able to get the steering wheel off, then pull the jam nut (M14/1.5) off the spindle and expose the plate that covers up the guts of the column.
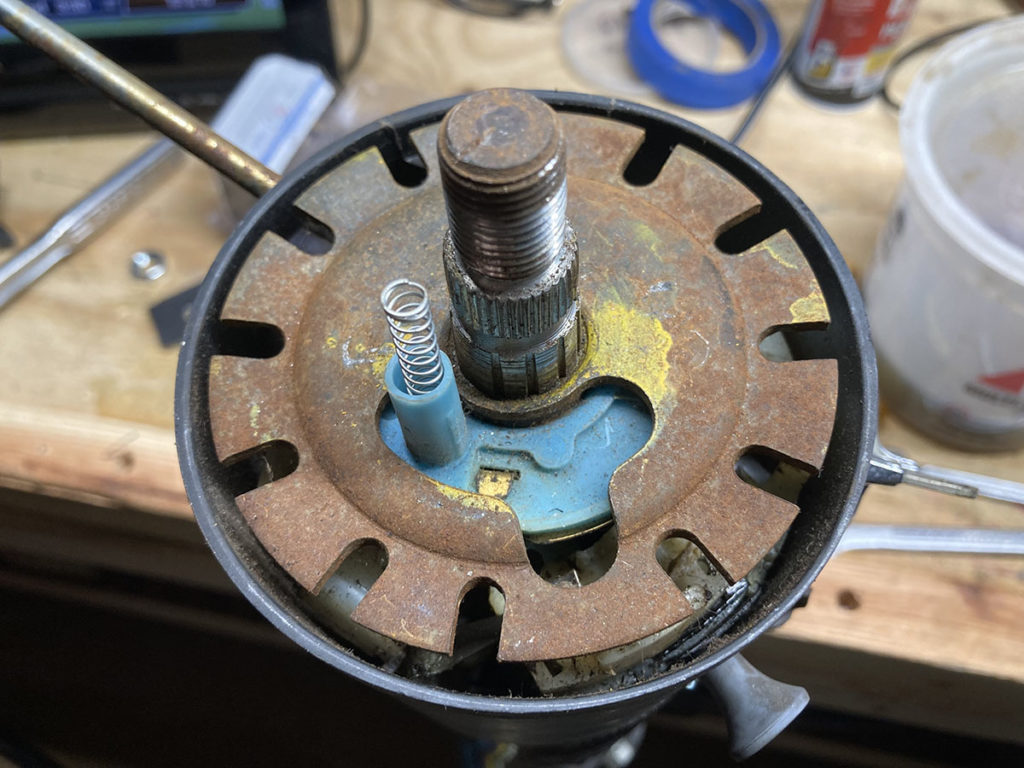
In order to get this plate out, you have to use another tool to depress it and expose a lock ring around the column, which took me several minutes with a pair of screwdrivers to get off.

With that plate out of the way, the next step is to take the turn signal disc out (the blue cylinder at the top). Jimmy it out with a screwdriver (GENTLY) and it should pop out.

And this is what I was faced with (on the spare column). I was hoping this one would be intact because I would be able to swap it into the column on Peer Pressure, but sadly one of the horns on the bottom half of the assembly broke off along with a twisted metal contact that mounted to something somewhere. That muddy, rusty mess at the 5’oclock position is all that remains of the metal contacts that help the switching mechanism sit in place. The mechanism itself was twisted into pieces and had fallen down underneath the main assembly.

I had to order an entirely new assembly and drop it into place—I went with a Light Line vendor, but the part is available on RockAuto for less: GM 1997985, which is the turn signal cam assembly for Scouts from mid 1977 and above (This spare column came from the 1978 I parted out in Flintstone).

The new part popped right onto place; you feed the wires back down through the column the same way they came out. The only thing I had to do was use an X-Acto blade to trim some extra plastic away from the divot where the turn lever bolts into place.

Now, the tricky part. The blue ring goes back in place, and what I found was that I had to align the divot on the top half with the one unsplined section of the shaft. You’ll notice on the retaining ring that there’s one tooth missing, so it only goes on the shaft one way. When it’s lined up properly the spring cup on the blue ring goes on just as it came out in my picture.

Then I use my ghetto depressing tool to push the retaining ring down in order to put the snap ring in place. This is where I’m stopping right now, as I’d like to use the new part in Peer Pressure, which means I have to pull it back out of this spare column and button everything up. And I’m not going to tear the column in my working truck until the temperature gets back up over 60˚, so I’m stalled for the time being.
Meanwhile, Mike at ScoutCo posted a handy little video on Instagram about how to pull the old lock out of a traveltop latch:
View this post on Instagram
Which is great, because I didn’t know about the little retaining clip until I watched this. I’ve got my spare latch on the workbench soaking in PBblaster, and I’m waiting to go down and follow his directions. It would be cool to have a locking latch on my Scout for the first time ever…
→ This is a syndicated post from my Scout weblog. More info here.
Wing windows on Scouts tend to break in three different places: the metal bar spanning the bottom of the mount (under the rubber) rusts and splits in half, usually around the spring. The inside latch breaks off at the base after years of opening and closing. Or, the hinge on the outside breaks off at one of the welds. The passenger side hinge broke on Peer Pressure’s window a few years ago. I’ve been meaning to replace it for a while now—I’d actually bought a replacement at Nationals in 2019. Saturday I figured I’d break the door down and get the new one in place.
I’ve actually got several spares. The one from Nats was crudely re-welded at some point, and the rubber is cracked in several places. I have a spare wing set from another parts haul but the metal bar is shot. The windows on the red doors look good, but the latch is busted on the passenger side. The wing unit on the Flintstone Scout doors look great: the rubber is in excellent shape, the chrome is perfect, and the latches work. Figuring this was the best option, I broke the passenger door down and got inside, and it was at this point I found that the metal track was rusted and probably stuck to the bottom track.

Sidebar: in order to remove windows from a Scout, you first have to unbolt and pull the wing windows out. Their frames integrate the top section of track that the main window follows upward as it closes; this track slides into a lower half that’s bolted into the door. Then you roll the window down, detach it from the scissor mechanism, and pull it out. Be careful with the scissor mechanism.
Because I was in a bit of a rush, I figured I’d use the Nats window and get it installed, and let the Flintstone door soak in PB blaster until I can get to it.

Getting the broken unit out was the hardest part. On paper, it’s easy. There are three bolts: one behind the silver button on the inside of the door, and two on the front side of the door above the top hinge. Lay some painter’s tape over the paint and use a 5-in-1 tool and a hammer to pop the button off. Two of the bolts are easy to remove but the top bolt above the hinge is tricky because there isn’t much room to get a socket inside the door and keep it attached to a ratchet; you have to pray it loosens by hand or pull the whole door off. Usually the bolts fall inside the door. I have a $2 Harbor Freight magnet for this situation.

Then it took a lot of coaxing, some PB blaster, lithium grease, and a good suggestion from Finn to get the window frame broken free and moving upwards—rain collects in the space between the tracks and welds them together with rust; this is the issue with the Flintstone doors. With proper leverage and a wood block, we worked it all the way out. I put that aside, greased the tracks, and used a rubber mallet to tap the replacement into place. Then I finger-tightened the bolts and tightened them with sockets.

So now there’s a latching wing window on the truck, but it looks shitty from the outside. At some point I’m going to start replacing broken parts with clean new ones; I just don’t know when that’s going to happen.
→ This is a syndicated post from my Scout weblog. More info here.

I’ve been putting a lot of miles on the Scout this summer, and she’s been running exceptionally well for me. My records show that I’ve put 1133 miles on since I went to Nationals, but as I’ve mentioned before my speedo calibration is wrong. If I do the math for my latest trip back from Chestertown, Google tells me my route from my last fillup was 87.5 miles. My odometer reads 77 miles. If I redo the ratio I worked out a couple of years ago I now come up with 100 miles true to 88 miles indicated (vs. 100 true to 78 indicated). When I apply that to the mileage recorded in my notebook, that works out to 2528 miles since the beginning of the year.
Doing some sleuthing, it looks like there’s a fuse blown or some other electrical gremlin between the switch on the dash and the wiper motor; the motor itself works fine when I put 12 volts to the contacts. From what I’ve read, the wiper switch itself has a breaker, and the switch doesn’t go through the fuse panel. I’ve put in a replacement switch from a different Scout to see if that fixed anything but I’ve still had no luck, so I’ll have to keep looking.
→ This is a syndicated post from my Scout weblog. More info here.